In this post I will talk about how I built this website from the ground up using Hugo as site generator and Firebase as hosting provider. I wish you’ll find it helpful.
Web development has come a long way. Back in the late 90’s when I first came across Internet, anyone who knows anything about HTML would be considered very technical.
Fast forward into 2020, social media and smart phone is ubiquitous, web hosting services such as Wix and Wordpress have made content creation possible for anyone who wishes to create a website without much headache.
Why should you building a website from the ground up as opposed to using a web hosting service?
Maybe it’s for you
Building a website with a static site generator is not for everyone. George Cushen who is Hugo theme Academic’s main contributor once put:
…(it would) require a basic understanding of using the command line in the Terminal (Mac/Linux) or Command Prompt (Windows) app on your computer. If you are not interested in this, perhaps this is not for you…
But if going beyond content creation and learning more about building a website that is lightweight and secure, cost effective yet no vendor lock-in is your thing, then let’s dive right in.
Overview
First and foremost, let’s take a look on what will be covered in the post.
-
Register a domain name.
-
Set up Hugo as static site generator.
-
Use a kick-starter theme to get going quickly.
-
Deploy the site to Firebase.
-
Add your domain to the new site.
1. Register a domain name
It’s pretty straightforward. You come up with a great domain name. It is better to be concise and easy to remember. Be creative <3.
Then complete the domain registration on any Domain Name Registrar you prefer. I use Google Domains but there are other good choices such as Namecheap and GoDaddy.

June 2020: For a few reasons, one being Google domains does not provide API for dynamic DNS (A records), I’ve changed my domain name registrar to Namecheap, my DNS provider to Cloudflare].
2. Setting up Hugo
Hugo is a static site generator. There are many other site generators, I picked Hugo for a few reasons:
- It’s open source and backed by an active developer team and support community.
- It’s a monolithic program with no external dependencies.
- It’s production ready.
In a nutshell, Hugo renders content into HTML files and uploads the files onto your choice of hosting provider. Your content is what you write as content creator. Hugo takes content files written in Markdown (.md), a format that is intended to be used by technical and non-technical writers alike. Since inception, Markdown has become the de facto format in content creation and blogging.
If you need to learn about Markdown syntax, there are good guides such as Markdown Guide.
Installing Hugo
On macOS, I recommend using a package manager such as Homebrew to manage third-party packages. With Homebrew installed, to install Hugo, just run:
$ brew install hugo ;
All set. In case you need to check which Hugo version is installed, run hugo version. On my mac it returns Hugo Static Site Generator v0.70.0/extended darwin/amd64
For installing Hugo on Windows or Linux, refer to Hugo’s documentation.
3. Use a kick-starter theme
Hugo has built-in theme mechanism that allows developers to quickly run a theme and see the results. It also provides all the necessary building blocks for user to personalize the theme. There are many themes available on Hugo, for my own website I use Academic Theme. It also comes with a academic-kickstart repo on github for teasers.
The easy way to get started is to just fork the repo, download the code and run it.
Download the code:
$ git clone <replace-it-with-your-own-repo-url> ;
$ cd <your-repo-root-dir> ;
$ git submodule update --init --recursive ; # get the latest Academic theme
Run Hugo to serve the test site:
$ hugo server -D ;
Now visit http://127.0.0.1:1313/ on your web browser and you should see the homepage.
Congrats! You’ve got your first Hugo website up and running on your local environment!
Hugo only binds to local network address for security by default. If you need to test the site on another computer in your local network, run:
$ hugo server -D --bind=0.0.0.0 ;
4. Deploy the new site to Firebase
There are many out there: Google Firebase, GitHub Pages, Netlify and AWS Amplify to name a few. Each one has its own offering. I picked Firebase as my hosting provider because they seem to offer a bit more on their free tier.
First, install Firebase CLI and (optional) Google Cloud SDK CLI.
-
Firebase CLI. The recommended way is to run
npm i -g firebase-tools ;See its github repo for more detail. If you don’t havenpminstalled yet, run:brew install node ;. npm will be installed alongside node.js. -
Google Cloud SDK CLI. Run
brew cask install google-cloud-sdk ;
Next, go to Firebase to set up an account and create a new Firebase project. Make sure it uses the default free tier plan which is called Spark. Be noted you need to specify GCP resource location under Project Overview in Firebase Dashboard after project is created. The location can not be changed afterwards, so choose something close to you would be wise.

Set up service account authenication on Firebase
Authenticating with a service account allows you to use Firebase CLI to manage your Firebase project. Google has provided a step by step guide here.
When authentication is set up, go to your project root directory and follow the recorded screens below to initialize firebase and deploy the very first version of your site onto firebase.
Congratulations! Your website is online! You should find your Hosting URL at the end of the Firebase deploy output, it’s typically something like: https://your-project-id.web.app
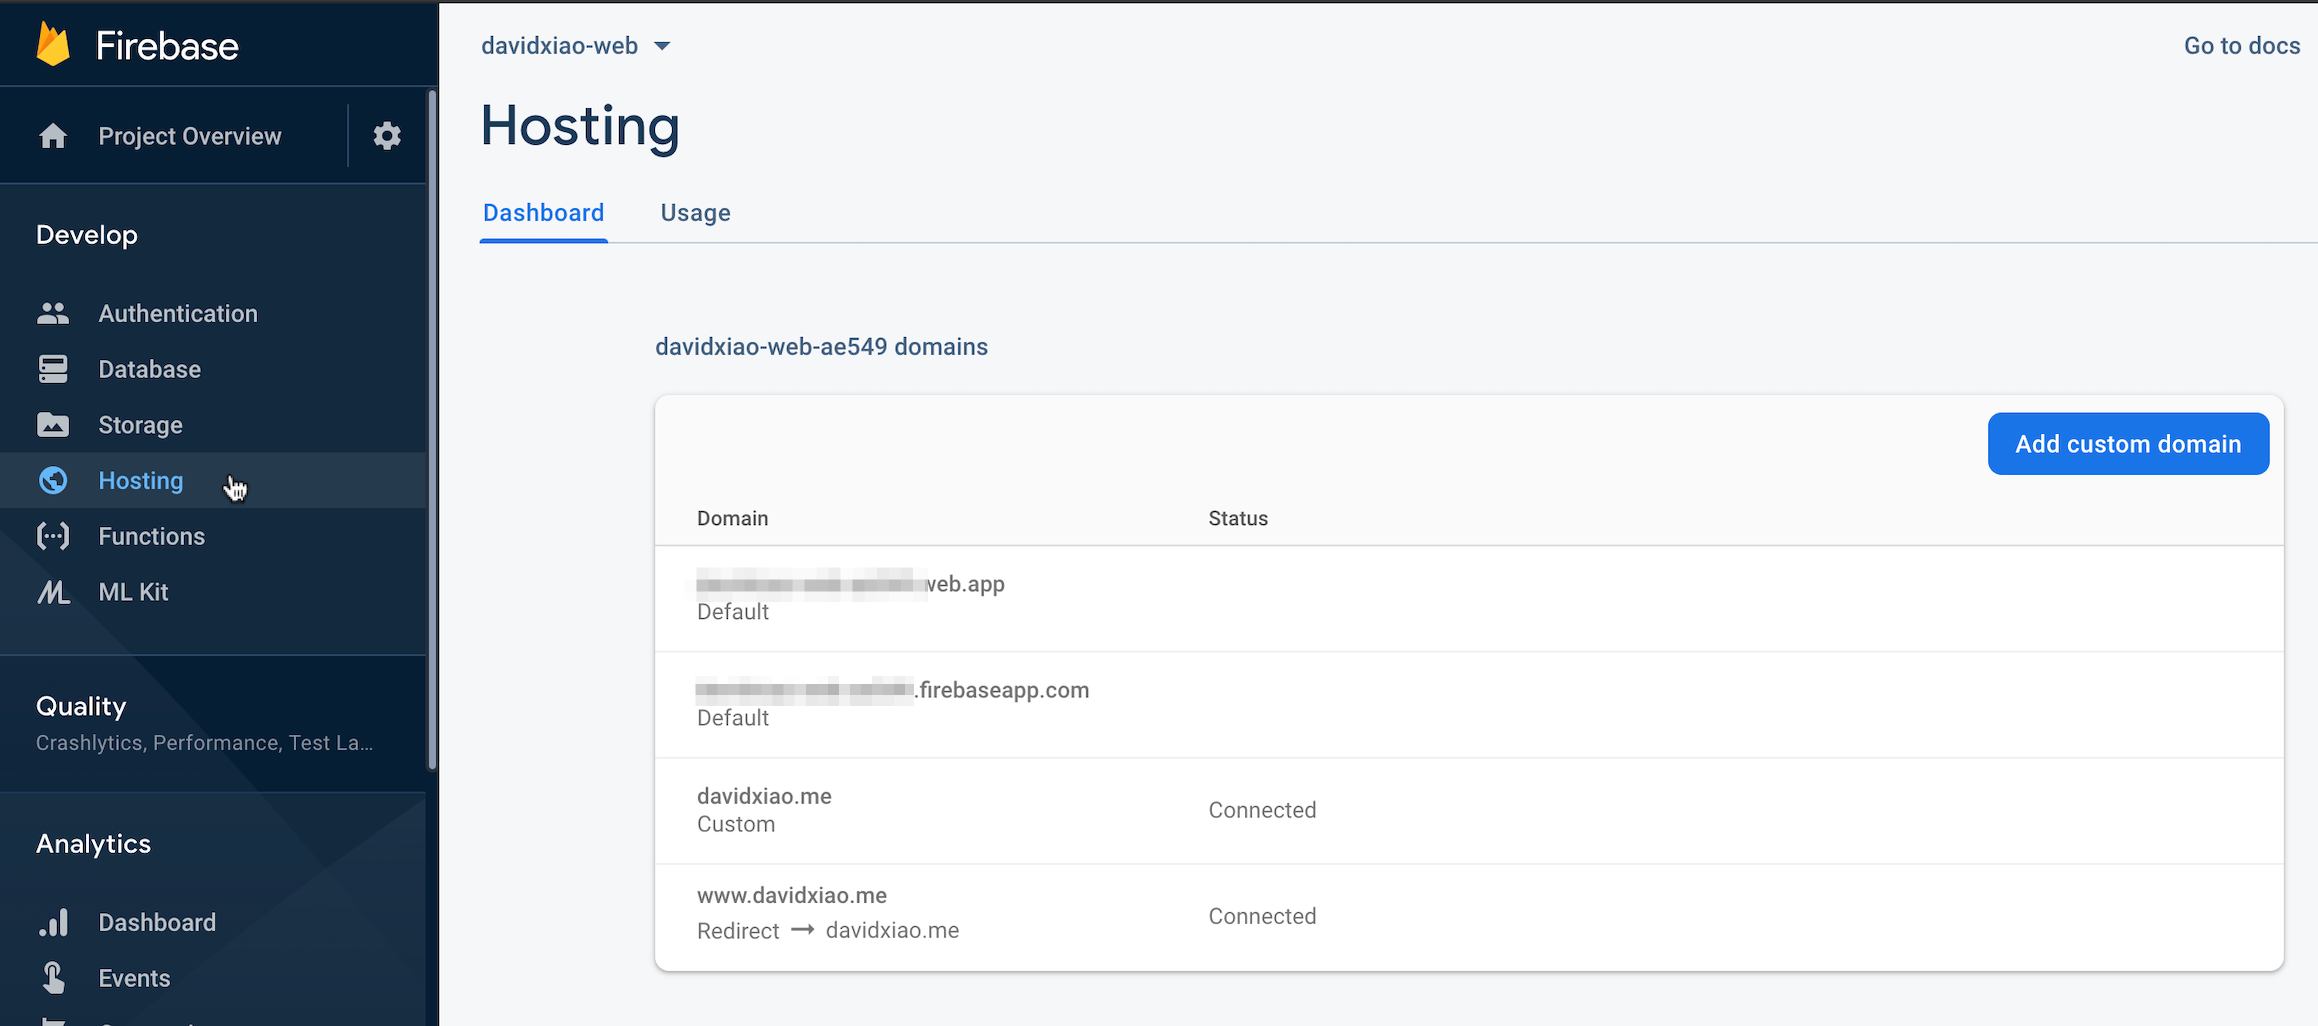
5. Add your domain to the new site
Go to Hosting on Firebase, click on “Add custom domain”. Typically you wanted to add your root domain name and a sub domain name such as “www”. For example, I added “davidxiao.me” for my website and added another entry for redirecting www.davidxiao.me to davidxiao.me
When it’s complete, you will be able to visit your website by your custom domain regsitered on step 1.