TL;DR
This is a curated, opinionated guide to building a home server. The vision is to build a computing environment under the budget of USD $3,000 with commercially available hardware. The goal is to provide a linux environment that can manage VMs, containers and microvms with ease. (why not just use proxmox?) As a platform, it allows the enthusiasts to experiment and try out new stuff such as PCI passthrough, AWS Site-to-Site VPN and more.
Hardware
The hardware list.
| Component | Configuration | Retail Price in USD |
|---|---|---|
| CPU | 16-core AMD Ryzen 9 5950X (Vermeer) | $799 |
| Motherboard | ASRock Rack xX570D4U-2L2T | $519 |
| Memory | 64GB. 2x32GB DDR4 3200 ECC Unbuffered DIMM. Model: Kingston KSM32ED8/32ME | 2x$199 |
| Storage | 1TB M.2 SSD. Model: SAMSUNG 980 PRO | $199 |
| GPU | Nvidia RTX 3090 Founders Edition 24GB | $1,499 |
| PSU | 850W Seasonic FOCUS PX-850 | $159 |
| Case | Corsair 5000D Airflow ATX Mid-Tower | $159 |
| CPU cooler | Corsair iCUE H150i RGB Pro XT, 360mm Radiator | $145 |
The reasoning behind the hardware I pulled together for this build are:
The home server needs to have hardware level remote server management capabilities and 10G network. ASRock Rack X570D4U-2L2T checks all the boxes by having a built-in IPMI and 2x10G ethernet ports.
As a leisure gaming enthusiast, Nvidia 3090 provides excellent performance for PC games and HDR10 in 4k if not 8k. The card gets it done no matter what kind of GPU thirsty task I through at her. That said, Nvidia 3080Ti may be a good alternative choice here with comparable gaming performance and a more affordable price tag.
64GB ECC memory ensures the server will have sufficient memory to run multiple VMs for most reasonable tasks and provides extra stability as ECC.
This build does not include any HDD other than the 1TB SSD as I already have a NAS at home. From a security and operational perspective, I believe having a dedicated storage, i.e. a NAS, as part of the home lab has certain advantages than having an all-in-one general purpose server that does both computing and storage.
UEFI BIOS configuration
Disable CSM to enforce UEFI boot. Enable onboard VGA.
Install and upgrade Windows 10
Create a bootable Windows 10 USB stick to install Windows. Install windows on the whole available space. When it’s installed, use the computer management to allocate sufficient disk space for ubuntu. In my case, I reserved about 500GB space for ubuntu.
Install and upgrade ubuntu
When windows 10 is installed, create a bootable ubuntu USB stick to install ubuntu.
# sudo apt-get update;
# sudo apt-get install dist-upgrade;
(reboot)
(optional) Config NICs for a faster boot
During the ubuntu boot-up, it will wait for some time for each network interface to be up. Configuring each unused network interface as “optional” will significantly speed up the boot time.
# sudo vi /etc/netplan/00-installer-config.yaml
Add “optional: true” under each network interface that is not in use. (reboot)
Install Oh-my-zsh
Since we will be using the command line pretty extensively for the rest of the guide, having omz and extensions like history-substring-search and zsh-autosuggestions would make our life a little easier.
# sudo apt install zsh

# sh -c "$(curl -fsSL https://raw.github.com/ohmyzsh/ohmyzsh/master/tools/install.sh)"

# git clone https://github.com/zsh-users/zsh-autosuggestions ${ZSH_CUSTOM:-~/.oh-my-zsh/custom}/plugins/zsh-autosuggestions
Edit ~/.zshrc, replace source $ZSH/oh-my-zsh.sh with the following:
plugins=(git history-substring-search zsh-autosuggestions)
source $ZSH/oh-my-zsh.sh
PROMPT="%{$fg[cyan]%}ubuntu %{$reset_color%}%D{%f}|%D{%k:%M}%{$fg[cyan]%} [%c] %{$reset_color%}"
bindkey "^[a" backward-word
bindkey "^[e" forward-word
export PROMPT_EOL_MARK=''
Restart the session. Everything oh-my-zsh should work now.
install nvidia cuda toolkit
The nvidia display driver is included as part of the CUDA toolkit
(optional) disable gdm3 at boot up
To disable gdm3 if needed, run:
# sudo systemctl stop gdm3; sudo systemctl disable gdm3;
Install ASPEED VGA driver
IMPORTANT: Ensure the Onboard VGA is Enabled before installing the vga driver.

# wget --no-check-certificate https://www.aspeedtech.com/file/support/Linux_DRM_LTS_112.zip;

# unzip Linux_DRM_LTS_112.zip;

# sudo apt-get install linux-headers-$(uname -r);

# sudo dpkg -i ~/Linux_DRM/DKMS/ast-drm-linux5.04.deb;
If next boot fails, revert to initrd.img-5.4.0-80-generic.old-dkms image. Run:
update-initramfs.......
If you see the following warning message W: Possible missing firmware /lib/firmware/ast_dp501_fw.bin for module ast, it’s related to a hard coded file location in the kernel module and can be safely disregarded.
(reboot)
(optional) to verify if the ast driver is loaded, run lspci|grep VGA;. If the driver is loaded, the output should look like: 29:00.0 VGA compatible controller: ASPEED Technology, Inc. ASPEED Graphics Family (rev 41)
Disable cloud-init
sudo touch /etc/cloud/cloud-init.disabled;
Install cockpit console
In this section we will be installing the cockpit admin console and its virtual-machine component.
sudo apt-get install cockpit cockpit-machines;
When complete, visit https://

(optional) To fix the Software updates issue with ubuntu/cockpit combination, run:
sudo systemctl enable network-manager.service;
sudo systemctl disable systemd-networkd.service;

(optional) Install a X Window Manager
sudo apt install ubuntu-mate-desktop;
When prompted, select “lightdm”. When installation is complete, run “sudo systemctl disable lightdm.service; sudo systemctl stop lightdm.service;”
For a quick test, run “mate-session” in a X11 forwarding enabled SSH session to start the Mate X window manager.
(optional) Enable Chrome Remote Desktop
references:
- https://cloud.google.com/architecture/chrome-desktop-remote-on-compute-engine#installing_chrome_remote_desktop_on_the_vm_instance
- https://support.google.com/chrome/answer/1649523
wget https://dl.google.com/linux/direct/chrome-remote-desktop_current_amd64.deb;
sudo apt-get install –assume-yes ./chrome-remote-desktop_current_amd64.deb;
sudo bash -c ’echo “exec /etc/X11/Xsession /usr/bin/mate-session” » /etc/chrome-remote-desktop-session'
On macOS, visit https://remotedesktop.google.com/ on Chrome and follow instructions to complete the configuration. You should then have Chrome remote desktop access out of the box.

(optional) Enable X11 Forwarding
This step is only needed when you prefer to use X window server as opposed to Chrome Remote Desktop for remote access.
In order to remotely access the X window applications on the ubuntu host via X11,
sudo vi /etc/ssh/sshd_config
and ensure X11Forwarding is set to yes.
From the guest OS (e.g. macOS), start a X window system, then open a terminal and run “ssh -X user@ubuntu” to connect to the remote host. When successfully logged in, run “xterm” on the remote host, the xterm window should show up on the macOS desktop.
GPU passthrough
References:
https://mathiashueber.com/pci-passthrough-ubuntu-2004-virtual-machine/
https://mathiashueber.com/storage-setup-virtual-machines/
Install required packages
sudo apt install bridge-utils;
ubuntu 20.04.02 comes with virt-manager 2.2, we wanted to install version 3.2 from source
sudo apt install gir1.2-gtk-vnc-2.0 gir1.2-gtksource-4 gir1.2-libvirt-glib-1.0 gir1.2-spiceclientglib-2.0 gir1.2-spiceclientgtk-3.0 libgtksourceview-4-0 libgtksourceview-4-common; #install dependant libs for virt-manager;
wget https://virt-manager.org/download/sources/virt-manager/virt-manager-3.2.0.tar.gz;
tar xzvf virt-manager-3.2.0.tar.gz;
cd virt-manager-3.2.0;
sudo ./setup.py install;
sudo vi /etc/default/grub;
Edit the line which starts with GRUB_CMDLINE_LINUX_DEFAULT to match:
GRUB_CMDLINE_LINUX_DEFAULT=“amd_iommu=on iommu=pt”
sudo update-grub;
(reboot)
Confirm the IOMMU kernel parameters by running cat /proc/cmdline;
Verify if IOMMU is enabled by running dmesg |grep AMD-Vi;
If it’s enabled, the output would look like:
[ 0.360711] pci 0000:00:00.2: AMD-Vi: IOMMU performance counters supported
[ 0.362643] pci 0000:00:00.2: AMD-Vi: Found IOMMU cap 0x40
[ 0.362645] pci 0000:00:00.2: AMD-Vi: Extended features (0x58f77ef22294ade):
[ 0.362648] AMD-Vi: Interrupt remapping enabled
[ 0.362648] AMD-Vi: Virtual APIC enabled
[ 0.362649] AMD-Vi: X2APIC enabled
[ 0.362725] AMD-Vi: Lazy IO/TLB flushing enabled
Determine IOMMU devices and groups
Caveat: If you are planning to make hardware changes, e.g. installing a new M2.SSD or adding a new GPU, be aware that the PCI lane numbers and IOMMU group numbers may change after the installation. If you already have the GPU passthrough setup up and running, you need to plan it accordingly so that it won’t catch you off guard.
Edit and run the following script as iommu.sh
Source: https://wiki.archlinux.org/title/PCI_passthrough_via_OVMF#Ensuring_that_the_groups_are_valid
#!/bin/bash
shopt -s nullglob
for g in find /sys/kernel/iommu_groups/* -maxdepth 0 -type d | sort -V; do
echo “IOMMU Group ${g##*/}:”
for d in $g/devices/*; do
echo -e “\t$(lspci -nns ${d##*/})”
done;
done;
Look for the GPU to be passed through. It should look like the following:
IOMMU Group 28:
2d:00.0 VGA compatible controller [0300]: NVIDIA Corporation Device [10de:2204] (rev a1)
2d:00.1 Audio device [0403]: NVIDIA Corporation Device [10de:1aef] (rev a1)
sudo vi /etc/default/grub
GRUB_CMDLINE_LINUX_DEFAULT=“video=efifb:off amd_iommu=on iommu=pt kvm.ignore_msrs=1 vfio-pci.ids=10de:2204,10de:1aef”
**** “video=efifb:off” is needed. See the discussion here. ****
sudo update-grub
(reboot)
Run lspci -nnv
Look for the line “Kernel driver in use” for the GPU and its audio part. It should indicate Kernel driver in use: vfio-pci
2d:00.0 VGA compatible controller [0300]: NVIDIA Corporation Device [10de:2204] (rev a1) (prog-if 00 [VGA controller])
Subsystem: NVIDIA Corporation Device [10de:147d]
Flags: fast devsel, IRQ 255
Memory at fb000000 (32-bit, non-prefetchable) [size=16M]
Memory at 7fe0000000 (64-bit, prefetchable) [size=256M]
Memory at 7ff0000000 (64-bit, prefetchable) [size=32M]
I/O ports at f000 [disabled] [size=128]
Expansion ROM at fc000000 [disabled] [size=512K]
Capabilities:
Kernel driver in use: vfio-pci
Kernel modules: nvidiafb, nouveau
2d:00.1 Audio device [0403]: NVIDIA Corporation Device [10de:1aef] (rev a1)
Subsystem: NVIDIA Corporation Device [10de:147d]
Flags: fast devsel, IRQ 255
Memory at fc080000 (32-bit, non-prefetchable) [disabled] [size=16K]
Capabilities:
Kernel driver in use: vfio-pci
Kernel modules: snd_hda_intel
Make sure you have Windows 10 ISO and virtio windows drivers ready for installation. virtio files can be downloaded here https://fedorapeople.org/groups/virt/virtio-win/direct-downloads/latest-virtio/
(optional) USB passthrough
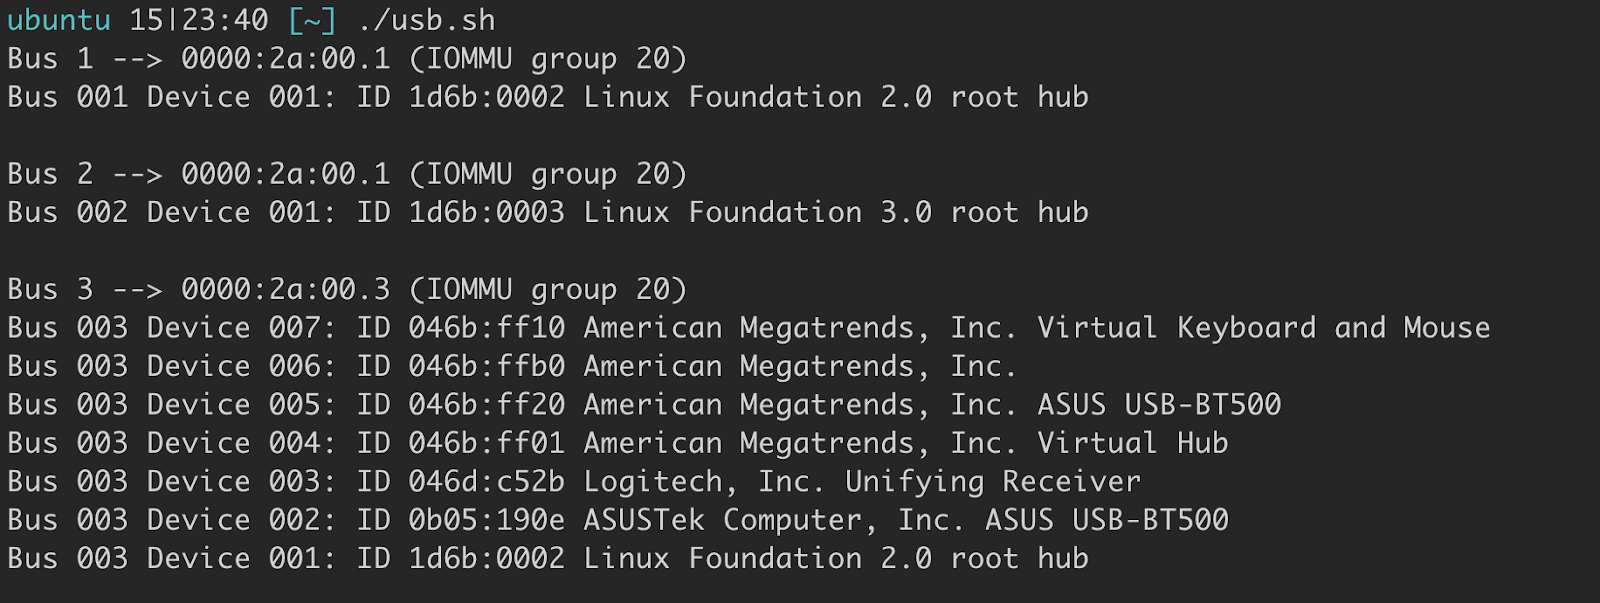
Use the following script (usb.sh) to determine what bus and iommu group each USB device has attached to.
Source: https://wiki.archlinux.org/title/PCI_passthrough_via_OVMF#USB_controller
#!/bin/bash

for  usb_ctrl  in /sys/bus/pci/devices/*/usb*; do pci_path=${usb_ctrl%/*}; iommu_group=$(readlink $pci_path/iommu_group); echo  "Bus $(cat $usb_ctrl/busnum) --> ${pci_path##*/} (IOMMU group ${iommu_group##*/})"; lsusb -s ${usb_ctrl#*/usb}:; echo; done
*** Troubleshooting Notes and Solution on isolating USB keyboard and mouse ***
Device passthrough is done on an IOMMU group level, in other words, when passing through a device, not just the device itself but also each and every other device in the same IOMMU group will be passed though.
In a perfect world, there should be an IOMMU group that includes only USB devices and nothing else. In the real world, there may be other types of devices in the group which makes the passthrough messy. Unfortunately in my case that’s the case.
Given the IOMMU group 20 includes not just USB keyboard and mouse but a few other devices such as “American Megatrends Virtual Keyboard and Mouse”, we need to find a way to move the USB devices into a separate and isolated IOMMU group, otherwise the USB device passthrough won’t work(tested).
(optional) manually compile and install QEMU
The default QEMU version that ubuntu 20.04 repo includes is QEMU 4.2. To get the current QEMU version 6.1 rc3, I decided to manually install it.
The binaries are installed under /usr/local/bin.
cd
sudo apt-get install build-essential gcc pkg-config glib-2.0 libglib2.0-dev libsdl1.2-dev libaio-dev libcap-dev libattr1-dev libpixman-1-dev libusb-1.0-0-dev
wget https://download.qemu.org/qemu-6.1.0-rc3.tar.xz
tar xvJf qemu-6.1.0-rc3.tar.xz
cd qemu-6.1.0-rc3
python3 -m venv py3-env
source ./py3-env/bin/activate
pip3 install ninja
./configure –target-list=x86_64-linux-user,x86_64-softmmu –disable-debug-info –enable-libusb
make -j24 #utilize multiple cores on my 5950X cpu
sudo make install
When QEMU manual installation is complete, edit /etc/libvirt/qemu/win10.xml and change the <emulator> line as follows:
<emulator>/usr/local/bin/qemu-system-x86_64</emulator>
(reboot)
Start the vm using virt-manager. If you see the following error:
Error starting domain: internal error: Failed to start QEMU binary /usr/local/bin/qemu-system-x86_64 for probing: libvirt: error : cannot execute binary /usr/local/bin/qemu-system-x86_64: Permission denied
Traceback (most recent call last):
File “/usr/share/virt-manager/virtManager/asyncjob.py”, line 65, in cb_wrapper
callback(asyncjob, *args, **kwargs)
File “/usr/share/virt-manager/virtManager/asyncjob.py”, line 101, in tmpcb
callback(*args, **kwargs)
File “/usr/share/virt-manager/virtManager/object/libvirtobject.py”, line 57, in newfn
ret = fn(self, *args, **kwargs)
File “/usr/share/virt-manager/virtManager/object/domain.py”, line 1329, in startup
self._backend.create()
File “/usr/lib/python3/dist-packages/libvirt.py”, line 1234, in create
if ret == -1: raise libvirtError (‘virDomainCreate() failed’, dom=self)
libvirt.libvirtError: internal error: Failed to start QEMU binary /usr/local/bin/qemu-system-x86_64 for probing: libvirt: error : cannot execute binary /usr/local/bin/qemu-system-x86_64: Permission denied
It may need to change some apparmor config.
In /etc/apparmor.d/abstractions/libvirt-qemu
add
/usr/local/share/qemu/** r,
and add
/usr/local/bin/qemu-system-x86_64 rmix,
/usr/local/bin/qemu-x86_64 rmix,
In /etc/apparmor.d/usr.sbin.libvirtd
add
/usr/local/bin/* PUx,
When complete, run
sudo systemctl reload apparmor